Monday, 9 December 2019

                                                                 Thai Curry


A little bit of an update before we get into the actual cooking. We’re going to be moving this blog! I (along with a few friends) recently purchased a domain for an unrelated project and I realised that it gave me an opportunity to move off blogger, something I’ve wanted to do for quite some time. I’ve got a friend who’s helping me figure out the logistics behind the move. It’s on the roadmap and we’ll get there. 

Speaking of roadmaps, this post is actually something I hadn’t intended on publishing until mid January (gasp, has he actually planned ahead for once?) for a few different reasons (one of them being I haven’t made this in a while and I don’t have many pictures of the process) but a few people requested something simple so here we are. I last made this in a makeshift kettle a few years ago, which should tell you how simple it is. With that being said, onto the actual blog post : 

As much as I love pasta, I do like to branch out and keep myself on my toes. This is something on the opposite end of the spectrum. This is a creamy Thai curry that you can make either with meat or just with vegetables. 
It’s entirely up to you! If you are using meat, I highly recommend pork but chicken will do as well. You’re going to need the following 

Thai curry paste - 1 tablespoon (this works with red, green and yellow curry paste so you can use any of them)
Coconut milk - 1-2 small cartons, this depends on you
Pork/Chicken - thinly sliced, about 100-200g (optional)
Carrots 1-2
Beans 1 bunch/handful
Broccoli -1 large (optional but I quite like adding broccoli to this)
Bell peppers - 1-2
Zuchini 1

Now, the vegetables are entirely up to you but I’d recommend avoiding stuff like tomato or corn. Now that that’s out of the way, if you’re using meat, start by browning your meat with a tiny bit of oil. Once you’ve got some colour on it, take it out of the pan and set it aside. It doesn’t matter if it’s not fully cooked, we’re going to be cooking it in the curry again later anyway. We’re looking to get some fond on the bottom of the pan to add flavour to the curry. If you’re not using meat, you can ignore the meat and oil and go directly to the next step which is heating about a tablespoon of curry paste in the pan. If you’re using meat, scrape up the fond before it burns to mix it with the curry paste. 

Once that’s nice and fragrant, add your coconut milk and lower the heat a little. We want this to simmer. Mix it thoroughly so the mixture is uniform. Cook that for a minute or two and give it a taste. Is it too mellow? Add a bit more curry paste if you want more intensity. There’s no hard and fast rule that you can only use X amount of curry paste. While that’s simmering, start prepping your vegetables. You can dice your carrots and bell peppers but I like to snap the beans in half and add them to the pan. Add your vegetables and meat to the pot and let the entire thing simmer for a good 10-15 minutes. We want to cook this down a little to thicken the gravy but we don’t want to turn our vegetables into mush. Once you’ve got the thickness you want and your meat is cooked, take the pan off the heat and let it cool a little bit. 


I’ve found that different people like different intensities for the curry so you can add extra curry paste in the beginning or use less depending on how you like it. I like to serve this with plain rice but you can serve it with noodles as well. 

In hindsight, I'd have thickened the curry up more. Learn from my mistakes. 

Sunday, 27 October 2019

                                                       Chicken Parm

Chicken Parm is one of those dishes that I feel is super under-represented. I mean, think about it. Everyone’s had countless plates of pasta and pizza, but how many of you have actually tried it? Yeah, I thought so. 

For the uninitiated, chicken parm is actually quite simple. It’s a breaded, fried chicken breast that’s then baked in tomato sauce and cheese.  What this means is we’re going to have 2 ingredient lists down below - one for the chicken and one for the tomato sauce. Also, keep in mind that I was cooking for 4 people, feel free to adjust the ingredients accordingly 

Bread that thoroughly!
For your chicken, you’re going to need : 

Chicken breasts, butterflied - 4

Flour - 1/3 cup

Breadcrumbs - 1/2 cup

Oregano - 1 table spoon

Basil - 1 table spoon

Parmesan cheese (what else would we use in chicken parm, eh?) - 100g

Salt and pepper - to taste

2 Eggs

Mozzarella cheese - 200g

Now, you’re more than welcome to use whatever tomato sauce recipe you want but I used the one below to great effect : 

Tomato puree - 500ml 

Olive oil - 1/2 cup

Garlic - 5 cloves

Basil - 3 table spoons

Parmesan cheese (bet you were wondering where this would show up on the list) 100g

I recommend you start cooking your sauce first. It’s got to reduce to take the edge off the tomatoes, which is the perfect time to prepare your chicken. 

Baste your chicken. Thank me later. 
Start by sautéing your garlic in the olive oil and basil. Keep the heat low and infuse as much flavour as possible into the oil. Once your garlic is soft and your oil is nice and fragrant, toss in your tomato puree, mix it thoroughly and crank the heat up. Make sure the sauce doesn’t stick to the pan so give it a mix every so often. If you find that the sauce is still a little acidic, add a spoon of sugar to take the edge off. This varies based on the tomato puree you use. 

Pre-cheese
While the sauce is cooking, you’ll need to prepare your breading station. Get 2 plates and a bowl : flour on plate 1, beat your eggs in the bowl and on your second plate, breadcrumbs. 

I’ve seen people argue back and forth about their breadcrumbs - some people will grate parmesan into their bread, others don’t. Me? The more cheese the better, so grate about 100 grams of parmesan onto your breadcrumbs, season with salt and pepper and mix to make it uniform. 


Start breading your butterflied chicken. Dip the chicken into the flour first and get a nice uniform coating, then into the beaten egg and finally into the breadcrumbs. Make sure that you’ve coated your chicken thoroughly with the breadcrumbs and you don’t have any bald spots. 

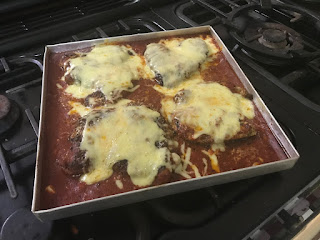
All the cheese!
A lot of people simply fry their chicken in plain olive oil, and you know what? I view that as a wasted opportunity to add some flavour so what I recommend is when you start heating the oil, add some basil, oregano and some chilli flake if you want some heat. Again, make sure you’ve infused flavour into that oil before you start frying your chicken. Make sure you remove anything you’ve added before you start frying though, otherwise it’ll end up burning. 


Finally, baste your chicken with the oil for maximum flavour. This achieves two things : it adds flavour to the crumb and it partially cooks the other half of the chicken, reducing the amount of time you need to keep your chicken in the pan. Remember, this is going into the oven to bake as well so we don’t want to overcook anything. 


Once you’ve fried up your chicken, pour your tomato sauce into a baking dish. Personally, I like to add some grated parmesan into the sauce for flavour but that’s up to you. Place your fried chicken into the tomato sauce, grate your mozzarella and parmesan cheeses and sprinkle liberally on top of each piece of chicken. 


Finally, bake that at 200C until the cheese is melted. If you’ve got a grill, you can brown the cheese. If you’ve done it right, you’l’ have beautifully crisp, flavourful chicken along with a rich, velvety sauce with lots and lots of cheese. What’s not to like?


Don't be silly, there's no such thing as too much cheese. 


Monday, 14 October 2019

Lemon Macarons 

I’ll be frank here, Macarons are…challenging at best. They’re stupidly temperamental and the slightest change in conditions will result in messed up macarons. If you’re new to baking, this isn’t a recipe I’d recommend you try just yet. Of the two dozen macarons I made, only a handful of them turned out good enough to be remotely photographable. 

With that out of the way, to make a set of Macarons, you’re going to need the following : 

Almond flour (about 100 grams)

Powdered Sugar (about 300 grams)

Egg whites (3)

Granulated sugar (60 grams)

Food flavouring (Lemon, a few drops)

Food Colouring (Yellow, a few drops)

Butter (60~ grams)

Vanilla extract (1/2  teaspoon)

Milk ( 1/2 teaspoon)

Macarons are highly sensitive to humidity so if you live in a humid part of the world, try running your air conditioner for a little bit. With that said, let’s get started!

Yes, that's sugar
Start by pouring your almond flour into a food processor/blender and pulse it a few times. This’ll help get rid of any clumps of almond in the flour. Next, sieve the flour into a mixing bowl. You’ll end up with a few lumps in the sieve, that’s fine. You can toss it out or eat it separately but don’t let them get back into the flour - we don't want any lumps in our batter. You don’t have to pulse the confectioners sugar, you can sieve that directly into the bowl. Sieve 200 grams of sugar into the flour mixture and set the remaining 100 grams aside for later


Pipe them smaller than this
In a separate bowl, start beating your egg whites. Don’t beat them into stiff peaks yet though. Once you’ve gotten some air into them and they’re light but not stiff enough to stand on their own, start pouring in your granulated sugar and mixing thoroughly with the beater. If you add the sugar too quickly, you’ll deflate your egg whites and that’s bad. Patience is key here. Once all the sugar has been added, beat the eggs to stiff peaks. 

Once you’ve beaten the eggs, add your food colouring. I’m making lemon macarons so I used yellow but if you’re making, say, strawberry, use pink. Whisk your eggs a little bit to ensure an even colour before you add your dry ingredients. 

Into the oven they go
This is the time where you want to be in your air conditioned room if possible. Pour your almond flour/sugar mixture into the bowl with the egg whites and start folding them together with a spatula. Ensure you’ve folded everything until the batter is uniform but do not over mix. You run the risk of losing all that air we beat into the eggs, resulting in flat, sad little macarons. In all the recipes I’ve seen for macarons, they recommend the following technique to know when to stop folding : hold your spatula above the bowl slightly and start drawing a figure of 8 with the batter slowly pouring back into the bowl. If you can get an entire figure of 8, you’ve mixed enough and should stop mixing. 

Spoon your mixture into a piping bag and pipe out little macaron batter rounds onto a baking tray lined with parchment/baking paper. Let them rest for at least half an hour. This is where the low humidity comes into play. You want a skin to form on the outer layer. You should be able to (gently) run your finger over the top of the macaron round without getting any batter on your finger. If the air is too humid, that skin won’t form and you’ll end up with crappy macarons. 

Bake them at 140 degrees Celsius for 10-15 minutes - this’ll vary on your oven so for your first batch, keep an eye on them and bake the rest of them based on that. Once you pull them out of the oven, LET THEM COOL before you touch them. Don’t make the mistake I did and start ripping them off immediately, leaving part of your macarons stuck on the paper. Let them cool entirely as when they’re hot, they’re very fragile. 

While they’re cooling, get your butter in a mixing bowl and whisk it until it is aerated and creamy.  Then, add your confectioners sugar and a few drops of your flavouring and beat until homogenous. Add a dash of milk if it’s too thick. You want a creamy texture here that can be spooned onto the macarons. 

If you want to be fancy, you can pipe the lemon cream onto the macarons but I just used a spoon. On the bottom of one macaron, spoon a small amount of cream and then place another macaron on top to form a little sandwich. 

If you’ve done everything right and the baking gods were merciful, you now have macarons! If, like me, your yield of perfect macarons was low, don’t worry about it. Even if they’re not perfect, they’re still delicious!  


Perfect? No. Delicious? Absolutely.