Monday, 9 December 2019

                                                                 Thai Curry


A little bit of an update before we get into the actual cooking. We’re going to be moving this blog! I (along with a few friends) recently purchased a domain for an unrelated project and I realised that it gave me an opportunity to move off blogger, something I’ve wanted to do for quite some time. I’ve got a friend who’s helping me figure out the logistics behind the move. It’s on the roadmap and we’ll get there. 

Speaking of roadmaps, this post is actually something I hadn’t intended on publishing until mid January (gasp, has he actually planned ahead for once?) for a few different reasons (one of them being I haven’t made this in a while and I don’t have many pictures of the process) but a few people requested something simple so here we are. I last made this in a makeshift kettle a few years ago, which should tell you how simple it is. With that being said, onto the actual blog post : 

As much as I love pasta, I do like to branch out and keep myself on my toes. This is something on the opposite end of the spectrum. This is a creamy Thai curry that you can make either with meat or just with vegetables. 
It’s entirely up to you! If you are using meat, I highly recommend pork but chicken will do as well. You’re going to need the following 

Thai curry paste - 1 tablespoon (this works with red, green and yellow curry paste so you can use any of them)
Coconut milk - 1-2 small cartons, this depends on you
Pork/Chicken - thinly sliced, about 100-200g (optional)
Carrots 1-2
Beans 1 bunch/handful
Broccoli -1 large (optional but I quite like adding broccoli to this)
Bell peppers - 1-2
Zuchini 1

Now, the vegetables are entirely up to you but I’d recommend avoiding stuff like tomato or corn. Now that that’s out of the way, if you’re using meat, start by browning your meat with a tiny bit of oil. Once you’ve got some colour on it, take it out of the pan and set it aside. It doesn’t matter if it’s not fully cooked, we’re going to be cooking it in the curry again later anyway. We’re looking to get some fond on the bottom of the pan to add flavour to the curry. If you’re not using meat, you can ignore the meat and oil and go directly to the next step which is heating about a tablespoon of curry paste in the pan. If you’re using meat, scrape up the fond before it burns to mix it with the curry paste. 

Once that’s nice and fragrant, add your coconut milk and lower the heat a little. We want this to simmer. Mix it thoroughly so the mixture is uniform. Cook that for a minute or two and give it a taste. Is it too mellow? Add a bit more curry paste if you want more intensity. There’s no hard and fast rule that you can only use X amount of curry paste. While that’s simmering, start prepping your vegetables. You can dice your carrots and bell peppers but I like to snap the beans in half and add them to the pan. Add your vegetables and meat to the pot and let the entire thing simmer for a good 10-15 minutes. We want to cook this down a little to thicken the gravy but we don’t want to turn our vegetables into mush. Once you’ve got the thickness you want and your meat is cooked, take the pan off the heat and let it cool a little bit. 


I’ve found that different people like different intensities for the curry so you can add extra curry paste in the beginning or use less depending on how you like it. I like to serve this with plain rice but you can serve it with noodles as well. 

In hindsight, I'd have thickened the curry up more. Learn from my mistakes. 

Sunday, 27 October 2019

                                                       Chicken Parm

Chicken Parm is one of those dishes that I feel is super under-represented. I mean, think about it. Everyone’s had countless plates of pasta and pizza, but how many of you have actually tried it? Yeah, I thought so. 

For the uninitiated, chicken parm is actually quite simple. It’s a breaded, fried chicken breast that’s then baked in tomato sauce and cheese.  What this means is we’re going to have 2 ingredient lists down below - one for the chicken and one for the tomato sauce. Also, keep in mind that I was cooking for 4 people, feel free to adjust the ingredients accordingly 

Bread that thoroughly!
For your chicken, you’re going to need : 

Chicken breasts, butterflied - 4

Flour - 1/3 cup

Breadcrumbs - 1/2 cup

Oregano - 1 table spoon

Basil - 1 table spoon

Parmesan cheese (what else would we use in chicken parm, eh?) - 100g

Salt and pepper - to taste

2 Eggs

Mozzarella cheese - 200g

Now, you’re more than welcome to use whatever tomato sauce recipe you want but I used the one below to great effect : 

Tomato puree - 500ml 

Olive oil - 1/2 cup

Garlic - 5 cloves

Basil - 3 table spoons

Parmesan cheese (bet you were wondering where this would show up on the list) 100g

I recommend you start cooking your sauce first. It’s got to reduce to take the edge off the tomatoes, which is the perfect time to prepare your chicken. 

Baste your chicken. Thank me later. 
Start by sautéing your garlic in the olive oil and basil. Keep the heat low and infuse as much flavour as possible into the oil. Once your garlic is soft and your oil is nice and fragrant, toss in your tomato puree, mix it thoroughly and crank the heat up. Make sure the sauce doesn’t stick to the pan so give it a mix every so often. If you find that the sauce is still a little acidic, add a spoon of sugar to take the edge off. This varies based on the tomato puree you use. 

Pre-cheese
While the sauce is cooking, you’ll need to prepare your breading station. Get 2 plates and a bowl : flour on plate 1, beat your eggs in the bowl and on your second plate, breadcrumbs. 

I’ve seen people argue back and forth about their breadcrumbs - some people will grate parmesan into their bread, others don’t. Me? The more cheese the better, so grate about 100 grams of parmesan onto your breadcrumbs, season with salt and pepper and mix to make it uniform. 


Start breading your butterflied chicken. Dip the chicken into the flour first and get a nice uniform coating, then into the beaten egg and finally into the breadcrumbs. Make sure that you’ve coated your chicken thoroughly with the breadcrumbs and you don’t have any bald spots. 

All the cheese!
A lot of people simply fry their chicken in plain olive oil, and you know what? I view that as a wasted opportunity to add some flavour so what I recommend is when you start heating the oil, add some basil, oregano and some chilli flake if you want some heat. Again, make sure you’ve infused flavour into that oil before you start frying your chicken. Make sure you remove anything you’ve added before you start frying though, otherwise it’ll end up burning. 


Finally, baste your chicken with the oil for maximum flavour. This achieves two things : it adds flavour to the crumb and it partially cooks the other half of the chicken, reducing the amount of time you need to keep your chicken in the pan. Remember, this is going into the oven to bake as well so we don’t want to overcook anything. 


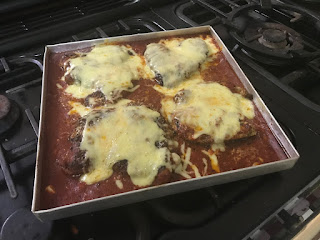
Once you’ve fried up your chicken, pour your tomato sauce into a baking dish. Personally, I like to add some grated parmesan into the sauce for flavour but that’s up to you. Place your fried chicken into the tomato sauce, grate your mozzarella and parmesan cheeses and sprinkle liberally on top of each piece of chicken. 


Finally, bake that at 200C until the cheese is melted. If you’ve got a grill, you can brown the cheese. If you’ve done it right, you’l’ have beautifully crisp, flavourful chicken along with a rich, velvety sauce with lots and lots of cheese. What’s not to like?


Don't be silly, there's no such thing as too much cheese. 


Monday, 14 October 2019

Lemon Macarons 

I’ll be frank here, Macarons are…challenging at best. They’re stupidly temperamental and the slightest change in conditions will result in messed up macarons. If you’re new to baking, this isn’t a recipe I’d recommend you try just yet. Of the two dozen macarons I made, only a handful of them turned out good enough to be remotely photographable. 

With that out of the way, to make a set of Macarons, you’re going to need the following : 

Almond flour (about 100 grams)

Powdered Sugar (about 300 grams)

Egg whites (3)

Granulated sugar (60 grams)

Food flavouring (Lemon, a few drops)

Food Colouring (Yellow, a few drops)

Butter (60~ grams)

Vanilla extract (1/2  teaspoon)

Milk ( 1/2 teaspoon)

Macarons are highly sensitive to humidity so if you live in a humid part of the world, try running your air conditioner for a little bit. With that said, let’s get started!

Yes, that's sugar
Start by pouring your almond flour into a food processor/blender and pulse it a few times. This’ll help get rid of any clumps of almond in the flour. Next, sieve the flour into a mixing bowl. You’ll end up with a few lumps in the sieve, that’s fine. You can toss it out or eat it separately but don’t let them get back into the flour - we don't want any lumps in our batter. You don’t have to pulse the confectioners sugar, you can sieve that directly into the bowl. Sieve 200 grams of sugar into the flour mixture and set the remaining 100 grams aside for later


Pipe them smaller than this
In a separate bowl, start beating your egg whites. Don’t beat them into stiff peaks yet though. Once you’ve gotten some air into them and they’re light but not stiff enough to stand on their own, start pouring in your granulated sugar and mixing thoroughly with the beater. If you add the sugar too quickly, you’ll deflate your egg whites and that’s bad. Patience is key here. Once all the sugar has been added, beat the eggs to stiff peaks. 

Once you’ve beaten the eggs, add your food colouring. I’m making lemon macarons so I used yellow but if you’re making, say, strawberry, use pink. Whisk your eggs a little bit to ensure an even colour before you add your dry ingredients. 

Into the oven they go
This is the time where you want to be in your air conditioned room if possible. Pour your almond flour/sugar mixture into the bowl with the egg whites and start folding them together with a spatula. Ensure you’ve folded everything until the batter is uniform but do not over mix. You run the risk of losing all that air we beat into the eggs, resulting in flat, sad little macarons. In all the recipes I’ve seen for macarons, they recommend the following technique to know when to stop folding : hold your spatula above the bowl slightly and start drawing a figure of 8 with the batter slowly pouring back into the bowl. If you can get an entire figure of 8, you’ve mixed enough and should stop mixing. 

Spoon your mixture into a piping bag and pipe out little macaron batter rounds onto a baking tray lined with parchment/baking paper. Let them rest for at least half an hour. This is where the low humidity comes into play. You want a skin to form on the outer layer. You should be able to (gently) run your finger over the top of the macaron round without getting any batter on your finger. If the air is too humid, that skin won’t form and you’ll end up with crappy macarons. 

Bake them at 140 degrees Celsius for 10-15 minutes - this’ll vary on your oven so for your first batch, keep an eye on them and bake the rest of them based on that. Once you pull them out of the oven, LET THEM COOL before you touch them. Don’t make the mistake I did and start ripping them off immediately, leaving part of your macarons stuck on the paper. Let them cool entirely as when they’re hot, they’re very fragile. 

While they’re cooling, get your butter in a mixing bowl and whisk it until it is aerated and creamy.  Then, add your confectioners sugar and a few drops of your flavouring and beat until homogenous. Add a dash of milk if it’s too thick. You want a creamy texture here that can be spooned onto the macarons. 

If you want to be fancy, you can pipe the lemon cream onto the macarons but I just used a spoon. On the bottom of one macaron, spoon a small amount of cream and then place another macaron on top to form a little sandwich. 

If you’ve done everything right and the baking gods were merciful, you now have macarons! If, like me, your yield of perfect macarons was low, don’t worry about it. Even if they’re not perfect, they’re still delicious!  


Perfect? No. Delicious? Absolutely. 


Tuesday, 30 October 2018


        As of late, there have been a few new establishments that have opened in Rourkela. I took this as my cue to dust off the old blog and start writing! One of these establishments happens to be Maaya, an eatery located inside Mokshaa - right next to the main restaurant. 

Right off the bat, I have to say it. I love their ambience. The soft lighting, the glasses hanging down from the ceiling, there’s just a certain charm to it that you don’t get in most of the eateries in Rourkela. There’s both indoor and outdoor seating available, but if you ask me inside is the place to be. There are comfortable leather seats that run the circumference of the interior with wooden seats facing inwards. 

Indoor seating. Picture from google. 
The menu here is quite varied - they have quesadillas, kebabs and everything in between! In the three times we’ve been, we’ve tried a fair number of items including their pizzas, sandwiches, meal combos, quesadillas, their poutine, pasta and even a few mocktails. 

I’ll start with the pizza because it was easily the most disappointing dish we’ve had at Maaya. It was absolutely tiny and was more of a side dish than anything else but the prices would indicate that you’re getting a decent sized pie! Brushing aside the pizza, the rest of the food was brilliant.

As for the mocktails, I’m a simple guy. I see a Mojito, I order a Mojito. I’ve had my fair share of them and the one at Maaya was one of the best I’ve had in Rourkela. The others we tried were pink lemonade and a chocolate milkshake whose actual name eludes me, but like I said. I see a Mojito, I order a Mojito and I liked this one. 

I haven’t tried actual poutine so I can’t comment on it’s authenticity but the poutine here is delightful. In fact, all three times we visited, poutine was the first dish we ordered! While the pasta we tried was called Carbonara, it was more of a generic white sauce with chunks of chicken. Not that there’s anything wrong with that, it’s just not Carbonara. Nor is the pesto. It was extremely creamy with chunks of broccoli in it. Not that there’s anything wrong with that, it’s just not pesto

Outdoor seating. Picture from google. 
Unfortunately, here’s where the glowing review gets a little critical. Maaya is a bar. Their main money maker is alcohol. You get the feeling that if you don’t order drinks, you’re a second class citizen here. On one occasion, our waiter blatantly ignored us on several occasions, only to wait patiently near the table next to us as they were getting copiously drunk. On another, it felt like the waiter was pushing us to order some booze and when the bill arrived, he lamented that it was only ₹750. Excuse me? I’ve just spent a fair bit of money at your restaurant - that's not an appropriate response at all. It’s a shame, because otherwise, Maaya has the best ambience of any restaurant or eatery in Rourkela. 

Financially, Maaya will leave a hole in your pocket. Probably not as big as mayfair, but you’ll feel it alright. A full meal for 4 including starters, soup, mocktails and a main course came out to ₹2200 after the student discount. Yikes. However, if you’re willing to forgo some of the smaller items we had, you can bring that down to a much more palatable amount, like the ₹750 I mentioned earlier in my review. 


I’m quite conflicted as I write this conclusion. I love (most of) their food. I adore their ambience. I like not having to shell out ₹400+ on transportation. However, it is unacceptable to pay that much for food and have the staff pass a comment like that or for the staff to be that blatant in waiting serving some tables while ignoring others. That’s not to say I don’t like Maaya. I do, it’s just that I believe that tables should have equal preference, regardless of what they order.


Saturday, 6 January 2018


Dice your chicken like this
So, I decided to move away from pasta for this post. I’m not completely done with it - I still have another pasta post on its way, but the next 2 posts (not including this) are not going to include pasta in any way or form. After all, there’s only so much of the stuff you can eat!

I saw a pie sitting in a bakery window and thought why not? Rather than make a fruit pie, similar to the one I saw, I decided to make an old favourite of mine - Chicken Pot Pie. 

For Chicken Pot Pie, you’re going to need : 

  • 100ml of olive oil
  •  500 grams of chicken breast, diced
  • 2 large onions
  • 2 carrots
  • 1 celery
  • 1 small bag of frozen peas
  • 1 cup of chicken stock
  • 1/4~ cup of flour
  • 1/2 carton of cream (small)
  • A few pinches of thyme
  • Salt & Pepper to taste
  • Pie crust to line a bowl/pie dish
  • 1 egg
Brown your chicken

Despite the long list of ingredients, it’s not too difficult to make a mouth watering pie. 

Start off by slicing your chicken breast into bite sized pieces. Heat some olive oil in a pan and toss your chicken in when the oil is nice and hot. Brown the chicken - ideally 6 minutes per side but you can stretch this a little further if you’ve cut your chicken into bigger pieces.  Be sure to season each side of chicken with salt and pepper. 

Mix it all together!
While the chicken is being browned, dice your onions, carrots and celery into cubes. Once your chicken has been browned, put it aside and toss your diced veggies into the pan along with some thyme. If you’ve got some fond (chicken bits stuck to the pan), that’s not a a problem. If anything, it’ll add more flavour to your filling. Again, season the vegetables with salt and pepper or you’ll end up with bland filling. Once you’ve mixed the vegetables with the thyme and seasoning, coat them lightly in flour and stir your vegetables to get a nice even coating. 
For your broth, you can make it from scratch, but I had neither the time nor the inclination to do that. Instead, take 2 large stock cubes (or 4 small ones) and put them in a cup of hot water. Stir thoroughly to ensure you have no lumps and that should be your broth done. Pour it into the pan with the vegetables and let it simmer for about 10 minutes. 
Dump the filling into the pie 

While the pot is simmering, it’s time to get the pie crust ready. I, unfortunately couldn’t find any piecrust in the supermarkets. What I did find was Samosa shells, so thats what I used. I layered samosa shells on top of each other, separating each layer with a coat of egg wash.  Egg wash is simply a beaten egg that can be brushed onto the pastry layers. If you’re using Samosa shells like I did, be sure to have at least 3 layers of shell for the base and walls. 

Sealed up and ready to bake!
By now, your pie filling should have simmered for about 10 minutes. Pour your cream in, give it a mix and toss in the peas and the chicken you browned earlier. Don’t worry if your peas are frozen, they’ll thaw in the heat of the oven. Your pie filling is now complete! 

Heat your oven to 250 degrees Celsius and pour your pie filling into the piecrust/samosa monstrosity you made a few paragraphs ago. Cover the filling to seal it off and put it in the oven for half an hour. As with the base, be sure to have at least 3 layers of samosa shell all painted with egg wash between the layers.

The final product!
I’m not the biggest fan of celery, so the next time I make this, I’ll probably use a little less celery and compensate with onions and carrots, which I happen to love. However, you’re free to change the vegetables around, within reason of course. I highly doubt adding, say, tomatoes to this would end well. As always, if you’re going to make this yourself, please do let me know! I’d love to hear about other people replicating whatever I write about and adding their own twist to it!


Bonus shot!


Tuesday, 26 December 2017

Despite the fancy name, Spaghetti Aglio e Olio is actually quite simple. So simple, in fact, that you only need 7 ingredients!  Aglio means garlic in Italian and Olio means oil. No prizes for guessing the main ingredients here.

If you want to make this at home, you're going to need the following :

Chop your garlic like this
  1. A packet of uncooked spaghetti.
  2. One or 2 bunches of parsley .
  3. About 3/4 cup of olive oil. Again, preferably extra virgin.
  4. One entire head of garlic. 
  5. One lemon.
  6. One spoon of chilli flakes.
  7. Salt and pepper to taste.
As with every spaghetti dish, you want to start out by filling a pot of water about halfway, adding a generous amount of salt and then heating it to a boil. Next, get your garlic and peel it. If anyone has a better method for peeling garlic, put it in the comments below please - I'm sick and tired of slicing it gently and peeling each individual clove. 

Now is a perfect time to prep your parsley. Pull the leaves off the stem - we don't want any stem for this. Chop the parsley as fine as you can, the finer you chop it, the better. Not only will it taste better, it will look better, but that's subjective.

Dice your parsley as fine as possible
Once your garlic has been peeled, finely chop it into slices. Done? Get a pan and pour the olive oil into it and start heating it. Once the viscosity of the oil resembles that of water, and well before the oil starts smoking, toss all your garlic into it and keep agitating the garlic so you don't brown it unevenly.

Wait till your garlic starts to brown!
By now, your water should have boiled so put the spaghetti in and go back to your garlic. Keep agitating the garlic until it starts to brown. Toss your chilli flakes in there and take it off the heat completely. The garlic will continue to brown and the oil will absorb the flavours of the garlic and chilli. 

If you've timed this right, your pasta should done by now. If not, wait till it's done and put your olive oil back on the heat to warm it slightly but be careful as to not brown your garlic any more. Pour the spaghetti directly into the olive oil pan along with a quarter cup of the spaghetti water. 

Toss your parsley into the pan and mix thoroughly. You want an even distribution of parsley - no green spots. Once you've achieved this, squeeze the juice of your lemon into the pan, mix it in and season to taste. 

Mix it all together!
Now, I'm not going to lie - when I first saw this recipe, I was skeptical. Spaghetti with chilli? Lemon juice with garlic?  It's incredibly simple and on their own, the ingredients are nothing special. However, the final product was nothing short of spectacular. It went down an absolute treat with my brother and sister and they finished it all!

If you want, you can toss in an extra spoon of chilli flakes - it's the only thing I'd have changed when I made this dish. I put in a healthy amount of parsley and garlic but I was skeptical about the chilli. If you're making it, learn from my mistakes and toss that extra spoon of chilli in there. On top of the extra chilli, I wish I had some parmesan on hand. I think that some grated parmesan would finish this off quite nicely but I didn't have any with me. Next time!

On the off chance that someone does end up making this, let me know how it turns out! I love the idea of someone reading my posts and trying it out for themselves!


The final product. I ended up making it a second time, hence the difference in noodle type. 


Saturday, 9 December 2017

I like to eat. I also like to write. As it turns out, you can combine these two and thus, my blog was born. It so happens that I also like to cook! I think you can see where I'm going with this...

To be honest though, I've actually been thinking about writing an entry or two about cooking for quite some time now. The main problem has always been that it's damn near impossible to cook in a hostel room, so I've been putting off such a blog post till I got home. Well, I'm finally home, so here we are!

I didn't want to start off with something too complicated, so I decided to make some spaghetti for dinner tonight. To make spaghetti the way I make it, you're going to need the following :


  1. Half a packet of uncooked spaghetti
  2. 2 small cartons of tomato puree (200ml each)
  3. a small bottle of olive oil (around 100ml)
  4. a few pinches of basil
  5. 2 onions
  6. 4 cloves of garlic
  7. 1 spoon of sugar
  8. half a stick of butter
  9. 1 capsicum 
  10. Parmesan cheese
To start off,  peel your onions and garlic. You also want to dice the onions - I'd advise you use swimming goggles to cover your eyes as onions sting. Slice your capsicum into slices and set them aside for later. Once you're done, heat some olive oil in a non stick pan. Ideally, you'd want to use virgin or extra virgin oil, but you can get by with pomace as well. 

Dice your onions and garlic like this
While you're heating the oil, take a boiling pan (or any pan that can hold a few cups of water) and fill it halfway with water and put it on your stove. Add a bit of salt as well. You're going to add the spaghetti to this once the water is boiling. The amount depends on the pot you're using, but you need enough to keep your spaghetti fully submerged. 

While you're waiting for the water to boil, move back to your oil. Brown your garlic and toss the onions into the pan as well. Keep pushing the onions around to prevent them from burning. They should be nice and translucent before you move onto the next step. Once your onions are translucent, add the 2 cartons of tomato puree. 

Ignore the burnt garlic
Now, ideally, you'd want to use real tomatoes but I was in a bit of a rush and took the easy way out. Add the tomato puree and keep stirring the mixture. After a few minutes of stirring, add the spoon of sugar. I know this sounds counter intuitive, adding su
gar to a main course but stick with me. 

Your sauce should look like this
By now, your water should be boiling. Add the spaghetti, making sure that it's covered entirely by the boiling water. Don't cook them fully, cook them to about 80%. 

In the meantime, add your half stick of butter to the sauce. Let it melt and work it into the sauce evenly - you don't want any butter lumps. This will thicken the sauce and take the edge off the tomatoes. 

Here's where things get slightly unorthodox - once your spaghetti is about 80% done, add the spaghetti to the sauce along with half a cup of the spaghetti water. Mix it in nice and evenly and let the spaghetti finish cooking in the sauce. Most people cook the sauce separately but believe me, this extra step is worth it. 

Finally, add your diced capsicum and let it cook for 5 minutes before turning the heat off.  Truth be told, the capsicum is optional. The only reason it's in this recipe is I found it in the fridge as I was rummaging for ingredients and it was just sitting there all sad and alone. 
This here is our lonely pepper!

Once the heat has been turned off, sprinkle the basil onto your spaghetti and mix it in. To finish it off, shred some parmesan for garnishing and a little bit of salt if you used unsalted butter. 

As for how it came out? This is the first time I've seen my grandpa lick his plate, so I can honestly say it came out quite well. If you have some minced meat on hand, you can brown the meat in the pan at the very beginning before adding the garlic and onions, but at that point, you've just made spaghetti bolognese. 

Let me know if you've got any questions and if you do try this out, let me know how it goes and if you'd like to see more posts where I make something and attempt to write about it, comment/message me! I'd be more than happy to continue with this kind of blog entry!


Forgive the crappy image, this is the only shot I could get  before they finished the spaghetti!